
A flood of new and awesome plugins continues to hit the Kodi market, both in the legal and somewhat illegal departments. The past few months we’ve seen some great plugins released but also lost some of the more popular ones like Genesis. One of the newer ones to hit the Kodi world is a plugin called Exodus which has a feel similar to that of Genesis…quite simply because it comes from the same developer. So if you’re looking for another Genesis fix check out how to use and install Exodus below.
The loss of Genesis (it still works, just no longer being developed) was a big one and thousands of Kodi users are now trying to find substitutes for their movies and TV. A few weeks back we released a tutorial on how to install the Genesis Fork labelled Specto but it to has been met with some problems.
If you’re unfamiliar with Specto it essentially is a Genesis clone but due to the massive spike in traffic the developer who created it has had to take measure to combat the surge in downloads.
There are hundreds of great plugins still being developed (SALTS, Velocity, The Royal WE, etc.) but if Genesis is your thing then you should take a look at Exodus.
Here’s what you need to know.
Contents
What you need to install Exodus on Kodi
- A Kodi box (quite obvious).
- You’ll want to install the Fusion Addon from the great folks at TV Addons.
Simply having Fusion installed makes this pretty easy. If you haven’t done so already I urge you to do so as soon as possible. If you’ve got both those installed then chances are you already know how to install Exodus into Kodi. But for those who are following this for the first time here is a step by step process on how to install and I’ll even show you how you can use Real Debrid to supercharge your viewing experience.
Installing Exodus into Kodi
With Fusion installed this becomes pretty straight forward. All we need to do is use the addon installer.
- Open up Kodi and browse to the “PROGRAMS” menu and hit enter.

- Up next we need to choose the option “Addon Installer“. If you don’t see this you may have to enter by selecting Program Addons instead.

- Once browsing the Addon installer head on over to the “Featured Addons” section and hit enter.

- From here simply highlight and select Exodus to start installing.
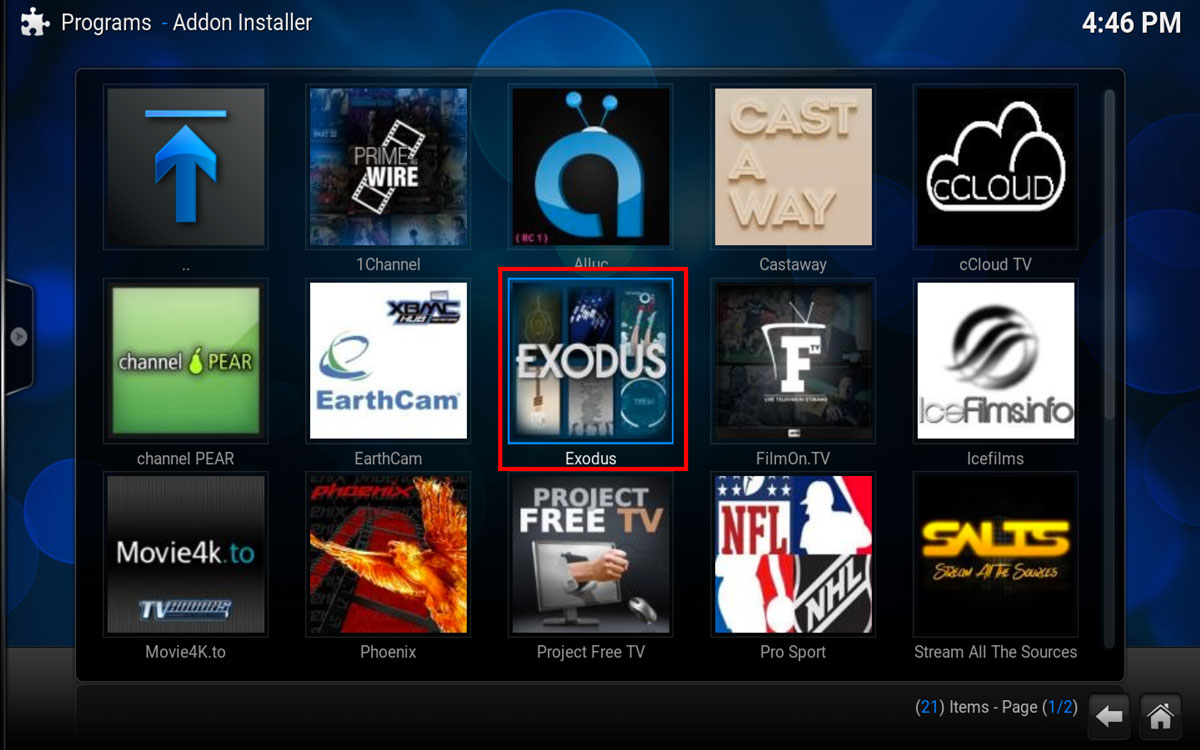
- Once you hit enter you should get a popup, we simply want to click install to continue.

- You should see a download notification indicator followed by this message below.

That should cover how to install Exodus into your Kodi setup. If you want to start using it right away you simply just need to visit the Videos->Add-ons section and should see it listed.
If you’ve used Genesis before it should feel very similar with a lot of the same options included. One of those options is the ability to integrate a premium streaming service like Real-Debrid into it. If you haven’t signed up for Real-Debrid, check out our tutorial first on how to install, then come back here to follow the steps below to set it up to work with Exodus.
Using Real-Debrid in Exodus in Kodi
Again if you’ve set this up in Genesis before chances are this should be pretty easy for you. If not feel free to follow the steps below to get up and running.
YOU MUST HAVE A REAL DEBRID ACCOUNT TO CONTINUE, CLICK HERE TO OBTAIN ONE.
- First thing you need to do is open up Exodus. Once inside the addon you can browse down and select TOOLS

- Inside tools you’ll want to select the option that reads SETTINGS: Accounts

- You should now see a popup, first you want to scroll on the tab menu over to ACCOUNTS. In the accounts options scroll down until you see REAL DEBRID and then click the Authorization box.

- You then will be greeted with another popup similar to below. From here you want to go to the URL it mentions (http://real-debrid.com/device) and make note of the Authorization code in the box.
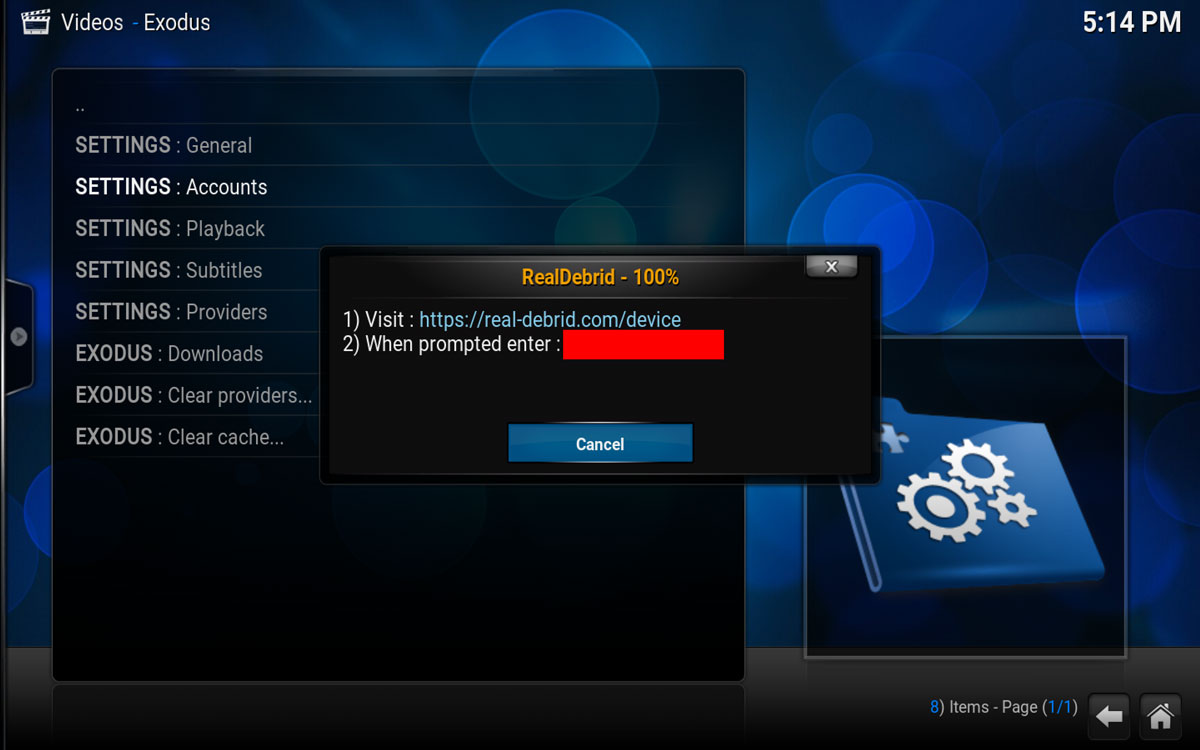
- Visiting the URL should bring you to a screen like this, enter in the Authorization code that was given in the previous step.

- If the code is correct you’ll then be greeted with a screen asking you to Allow or Deny, choose Allow.

- Once complete you’ll then be given a notice that the operation was successful and you can close the webpage.

- Now go back into Kodi and you should notice that the popup giving you the authorization has closed and you are now authorized in the Exodus settings.

- With the authorization portion complete you can now try and stream content in Exodus, now when you look you should see sources with the Real Debrid title like the image below.

Congratulations, you’ve now not only installed Exodus into your Kodi setup but also have it streaming with the premium Real Debrid service.

